Eat!

Eating is a necessity. However, we choose what to eat. The choices we make reveal a great deal about us. The food you eat can tell quite a bit about your heritage, your family, your fears, your sense of adventure, your attitude toward yourself and others, and a myriad of other personal tidbits to anyone paying attention. Everything about eating is a glimpse into your soul.

I hope to reveal a little bit about myself to you through my food. I enjoy cooking. I enjoy eating. I find pleasure in bringing pleasure to others. I hope that by sharing my recipes I bring you a little bit of joy.

Cook my food. Feed it to the people you love.

Showing posts with label Fast. Show all posts

Sunday, January 23, 2022

Pork Milanese

Milanese is a very old recipe. During the 1st century BC, Romans ate dishes of thinly sliced, breaded, fried meats. It is very similar to the Austrian dish Wiener Schnitzel.

I love the simplicity of this dish. It is easy to make and delicious. You will see other recipes suggesting you serve it with pasta or rice. Milanese is traditionally eaten over arugula tossed with Parmesan. Fresh lemon juice is squeezed over the entire dish.

Pork Milanese
Milanese is normally made with veal. I couldn’t find veal and I know that many people don’t eat veal, so I substituted pork. (Although, I had I found veal, I would have eaten it.) You can use traditional Italian breadcrumbs, but panko are crispier. If you do not have a meat mallet, you can use a heavy cup or a skillet. Get a meat mallet for heaven’s sake, though.

As always read through the recipe before starting

  • Servings:  6
  • Time:  Cook time: 20 minutes, cook: 15 minutes, Dinner in about 40 minutes
  • Hardware:  Measuring cups, plastic wrap, a meat mallet, a cutting board, 3 shallow bowls or dishes, a skillet, a large spatula for turning, paper towels, optional: a cooling rack placed over a baking sheet


 Ingredients

  • 1 cup panko breadcrumbs
  • 1 cup flour
  • 3 large eggs
  • 6 boneless center cut pork chops
  • Salt and pepper
  • Olive oil to cover the bottom of the pan
  • 3 lemons
  • Arugula salad and freshly grated Parmesan for serving.
  1. Cut the lemons into wedges. Set aside
  2. Thoroughly dry the pork.  Working with one pork chop at a time, place it on the cutting board and cover it in plastic wrap. Use the mallet (or a heavy skillet or coffee cup) to pound the chop until it is ⅓ inch thick. Repeat until all the pork is pounded thin. Generously salt and pepper it on both sides.
  3. Place the flour into one of the shallow dishes. I use glass pie plates for this purpose. Beat the eggs in the second dish. Then put the panko into the third dish. You can kind of crush the crumbs up a little.
  4. Add enough oil to the skillet to cover the bottom. Heat over medium. If you cook at a higher temp, the breadcrumbs will burn before the pork finishes. You want the oil to be hot enough that flour sizzles when sprinkled into it. You may need to add more while cooking.
  5. Dip each chop into the flour and shake as much from it as possible. Then dip it into the eggs and then into the crumbs. When you place the chop into the crumbs, press down and make sure that it is covered. When you are breading always go-dry, wet, dry.
  6. When the oil is sizzling, fry the pork chops without them touching. Fry on each side for about 3-4 minutes or until golden brown. Don’t crowd, you may need to cook in batches. Add more oil if the pan gets dry. Use the spatula and not a fork to flip the meat. Remove the finished pork chops to the cooling rack. You can keep them warm in the oven on the lowest setting. Placing them on a cooling rack will keep them  crispy.
  7. To serve, toss the arugula with the freshly grated Parmesan. Squeeze a little lemon juice over the salad. You can either slice the pork and serve it over the arugula with another lemon wedge or serve it beside the salad with the lemon.
  8. Simple and delicious!

Wednesday, October 6, 2021

Keftedakia, Traditional Greek Meatballs

Traditional Greek Meatballs

A new Mediterranean restaurant opened up in our hometown. The dishes are mostly Greek inspired with some Italian flair and pizza. I really, really love Greek food. Until this place opened, we had to drive 2 hours to get anything resembling authentic Greek. I am overjoyed.

The first time we went, I ordered the Gyro Pizza: Gyro meat, purple onions, tomatoes, and feta. The crust is oiled and not covered in tomato sauce. It is thin and chewy and delicious. The second time we went I ordered Keftedakia, Traditional Greek Meatballs. My dinner was so good, I almost cried.

I went home immediately and began to research Keftedakia. After trying various incarnations, I came up with these. They might not make you cry, but they sure will make you happy.

You can substitute lemon juice for the red wine vinegar. You can also add a little oregano and/or coriander. But I did this, and it was love.


Servings: 20 meatballs
Time:  Prep:  10 minutes; Cooking: 20 minutes; Meatballs in about 40 minutes
Hardware:  Measuring spoons and cups, a food processor, a silicone spatula, a mixing bowl, un-powdered latex gloves, a large heavy pan, a large shallow bowl (or a pie plate), slotted spoons, paper towel covered plate

Ingredients:

  • 1-pound ground beef
  • 1 small onion (4 ounces)
  • 2 cloves of garlic
  • 5-6 mint leaves
  • 1/3 cup fresh parsley
  • ¼ teaspoon black pepper
  • 1 egg
  • 1 teaspoon of red wine vinegar
  • ⅓ cup breadcrumbs
  • 1 teaspoon salt
  • ½ cup flour (maybe more)
  • Enough olive oil to fill the pan halfway
  • Toasted flatbread (pita or naan), feta, lemon, fresh slices of mozzarella , tomatoes and fresh chopped parsley, large grain salt for serving

  1. Put the onion, garlic, mint, parsley and black pepper into the food processor. Pulse until they are very finely chopped, but not liquefied. Add the egg, salt and vinegar and pulse a few more times. If you don’t have a food processor, chop the onions and herbs as fine as you can. Beat the egg and then proceed.
  2. Scrape everything from the processor into the mixing bowl. Add the breadcrumbs and meat. Put on latex gloves. Mix all the ingredients in the bowl with your hands. Make bite-sized (1 inch)meatballs.
  3. Heat the oil on medium high.  Place the flour into the shallow bowl. Lightly dredge the meatballs.
  4. Brown the meatballs for about 4 minutes and then turn. Don’t crowd the pan. You may need to fry them in batches. Remove them to the plate. You can keep them warm in the oven on the lowest setting until they are all finished.
  5. To plate you should place slices of tomato, mozzarella and toasted flatbread on the plate. Place the meatballs beside them and squeeze a little fresh lemon juice of them. Sprinkle on feta, fresh chopped parsley and a little finishing salt.

Sunday, July 25, 2021

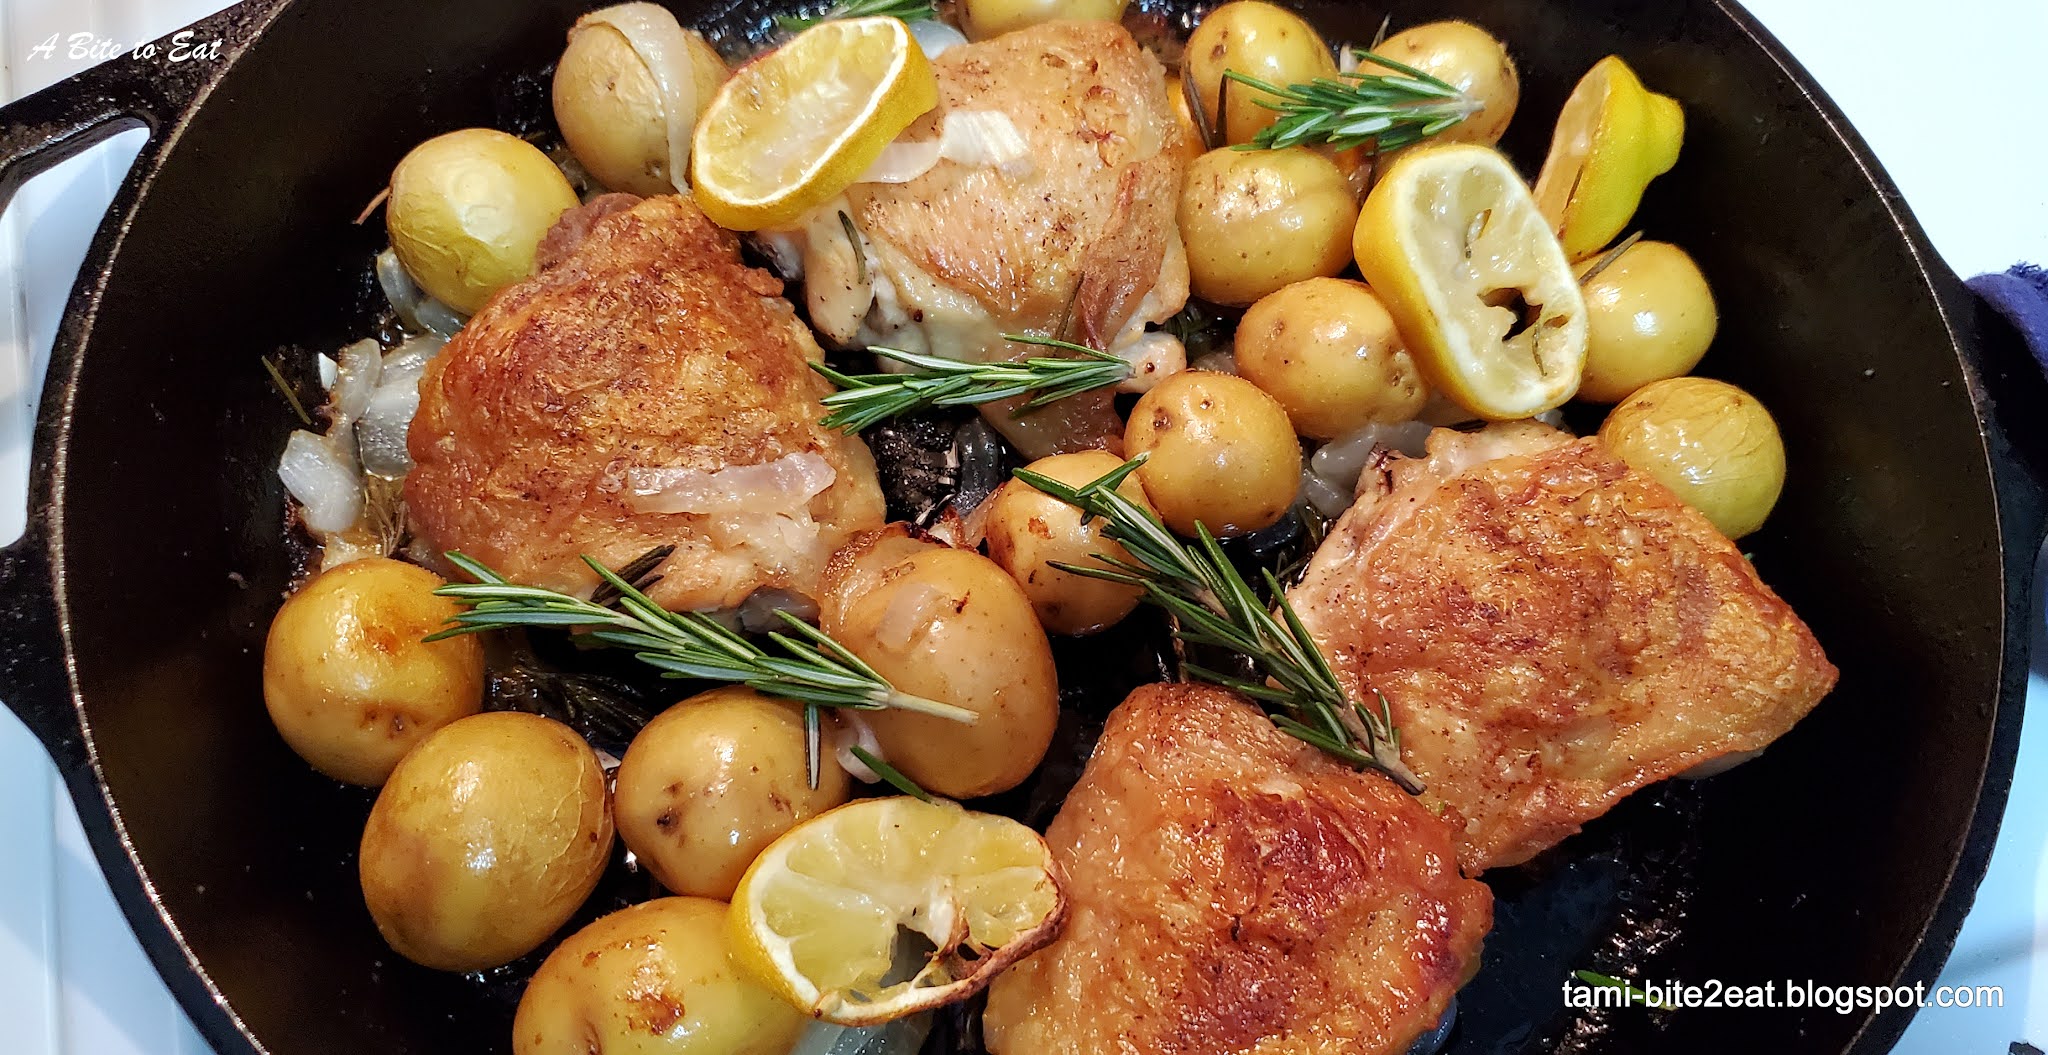
Rosemary Lemon Chicken and Potatoes

Rosemary Lemon Chicken and Potatoes

Rosemary Lemon Chicken and Potatoes is a one dish meal that checks off all the boxes. Delicious? Check! Simple to make? Check! Inexpensive? Check! Easy to clean up? Check! I just cooked up some steam in the bag broccoli to make this a complete meal.

When I make this, I use small new potatoes, because I just need to wash them and not peel or slice them. If you aren’t using new potatoes, add about 5 minutes to your prep time.

Servings: 4
Time:  Prep: 10 minutes; Cook: 50 minutes Dinner in about an hour
Hardware:  measuring cups, a microwave safe dish, a cutting board and knives, a small bowl, a large heavy bottom skillet that can be used on the stove and in the oven (I prefer a cast iron skillet), tongs, a thermometer

 Ingredients:

  • 4 chicken thighs
  • ¾ pound (12 oz) potatoes
  • ½ pound (8 oz) onion
  • 2 lemons
  • 3 or 4 sprigs of fresh rosemary or 2 teaspoons dried
  • ½ teaspoon of olive  oil
  • Salt & pepper
  1.  Pre-heat the oven to 375˚.
  2. Slice the onion into rings. Wash the potatoes. If you are not using baby potatoes, peel them and cut them into chunks. Slice one of the lemons. Slice the other lemon in half and juice it. Set aside.
  3. Sprinkle both sides of the chicken with salt and pepper. Be generous.
  4. Heat the olive oil in the skillet on medium high. When the skillet is hot, add the chicken skin side down. Cook for 6-8 minutes or until the skin is crispy. Turn the chicken with tongs and cook for 6 more minutes.
  5. While the chicken is crisping, place the potatoes in the microwave safe dish and zap on high for 5 minutes. This ensures that the potatoes don’t take longer in the oven than the chicken does.
  6. Nestle the onions, sliced lemon and par cooked potatoes around the chicken. Sprinkle on the dried rosemary or throw the sprigs of rosemary on top of the thighs. Pour lemon juice over everything and generously salt and pepper the whole dish.
  7. Place the skillet in the oven for 30-35 minutes or until the thermometer reads 165 ˚F  when inserted into the meatiest thigh.
  8. Allow the chicken to rest for 5 minutes before serving. 

Sunday, May 16, 2021

Seared Pork Tenderloin with a Pepper, Caper, Mustard Sauce

Seared Pork Tenderloin 

Pork tenderloin can sometimes be dry. This easy recipe comes out tender and moist every time. It also only takes about 15 minutes to make.

I have included a recipe for a Pepper, Caper, Mustard Sauce but you can change the recipe up by using any sauce you like. You can also use herbs and spices or a dry rub on the pork before you cook it. You can skip the cornstarch if you want.

Servings: 4-6
Time:  Prep: 5 minutes; Cook: 15 Minutes-Dinner in 20 minutes
Hardware:  a measuring spoons and cups, a cutting board and knives, a paper towel. a gallon, plastic bag, a heavy bottom skillet (I prefer a cast iron skillet), tongs, a thermometer, a bowl


Ingredients
  • 1-pound pork tenderloin
  • Salt and pepper
  • ¼ cup cornstarch
  • Cooking spray

  1. Cut the tenderloin into bite size pieces. You can cut it into medallions, but I like the look of an uneven rough chop. Pat the pieces dry.
  2. Generously salt and pepper the pieces and place them and the cornstarch into the gallon, plastic bag. Seal the bag and shake like mad to coat.
  3. Heat the skillet on medium high and spray generously with cooking spray.
  4. Shake the cornstarch from the meat and add it to the hot skillet. Don’t crowd the pork because if you do it won’t sear. It will steam. You may have to cook in batches.
  5. Allow the pork to sautĂ© for about four minutes. Flip it with the tongs. After 4 more minutes, begin to check the smallest pieces with the thermometer. Using the tongs, remove the meat and place it into the bowl as soon as the thermometer reads 145˚. Do not overcook!


Pepper, Caper, Mustard Sauce

You can use any sauce that you like. In reality, this meat is so juicy and tender that you don’t need a sauce, but here you go. This is also good for pork chops.

Hardware:  a measuring spoons and cups, a whisk (I use a flat whisk), a food grinder (we have a dedicated coffee grinder to use for this), a small strainer, the pan and pan drippings that you just cooked pork 

Ingredients

  • 1 tablespoon whole peppercorns
  • 1 tablespoon capers
  • 4 cloves of garlic
  • 2 tablespoons of butter
  • ½ tablespoon Dijon mustard
  • ¼ cup white wine

  1. Rinse the capers. Place the capers, peppercorns and garlic in the food grinder. Pulse the grinder a few times until the peppercorns are broken down.
  2. Don’t wipe out the skillet you cooked the pork in. Just melt the butter in it, using the whisk to scrape up any brown bits left in the pan. 
  3. Add in the peppercorn mixture and the mustard while continuing to whisk. Slowly add in the white wine. Taste and adjust the salt. Allow it to simmer on low until it is thick enough to cling to the back of a spoon. 
  4. You can return the pork to the pan or serve the sauce in a bowl and allow your guest to spoon on as much as they want.

Sunday, April 25, 2021

Orange Shrimp and Ramen Stir-Fry

Orange Shrimp and Ramen Stir-Fry

Chinese take-out isn’t necessarily Chinese food. It is usually very Americanized and might not even be recognized by a person who is actually from China. Orange Shrimp and Ramen Stir-Fry is Chinese take-out and not Chinese food. That being said, it is delicious and really easy to make.

I bought the shrimp already cleaned. If you are going to clean them yourself, it will add a great deal of time to the prep. I also bought different colored baby bells, just to add variety and color. If you want, you can buy a package of frozen peppers and onions to save time. They do not need to be cooked, just defrosted.


Servings: 6 
Hardware:  Measuring spoons and cups, a cutting board and a knife, a large, deep skillet, tongs, a large pot, a small bowl and a fork, paper towels, a wooden spoon 
Time:  prep: 15 minutes; Cook: 15-20 minutes; Dinner in about 30 minutes

 Ingredients:

  • 1pound large shrimp (31/35 shrimp per pound)
  • 2 cloves garlic
  • 1 medium bell pepper (8 ounces)
  • 1 small onion (4 ounces)
  • An orange with a really nice, clean skin
  • 3 green onions
  • 1 cup chicken broth
  • ⅓ cup orange juice
  • 2 tablespoons soy sauce
  • A pinch of red pepper flakes (or more depending on your taste)
  • 1 tablespoon cornstarch
  • 3 packages of Ramen noodles
  • Cooking spray
  • Salt
  1. If you didn't  buy the shrimp cleaned, do that first. Place them in the fridge until needed. Scrub the orange and slice it into eighths. Mince the garlic. Slice the pepper into long, thin strips and remove any white pith. Slice the onion into rings and then slice the rings in half. Slice the green onions into thin slivers. Open the packages of ramen, discarding the foil packets of salt.
  2. Fill the pot with water and put it onto boil.
  3. Rinse the shrimp, pat them dry and salt them. Drying them makes them get crispier.
  4. Spray the skillet with cooking spray and heat over medium. When the skillet is hot, cook the shrimp for 2-3 minutes on each side and remove to the plate. Don’t crowd them, you may have to cook them in batches.
  5. Add more spray to the same pan and sauté the garlic, onion and bell peppers until they are cooked enough for you. I like them still a little crispy. Remove them to the plate, too.
  6. Pour the chicken broth, orange juice and soy sauce into the still hot skillet. Bring to a boil and stir, scraping up any bits left on the bottom of the pan.
  7.  Add the cornstarch to a bowl with about 3 tablespoons of very cold water. Use the fork to mix until the cornstarch is completely dissolved. Add the cornstarchy water to the sauce and stir. Allow it to boil. The mixture should thicken.
  8. Turn the broth down to a very low simmer and add in all of the cooked veggies and shrimp. Sprinkle on the red pepper flakes. Taste and adjust the salt.
  9. Place the ramen in the boiling water. DO NOT OVER COOK THEM. It only takes 3 minutes. As, soon as the ramen is done, use the tongs to move them from the boiling water to the shrimp and toss to make sure everything is coated. Add in the orange slices and green onions and serve right away.

Sunday, September 27, 2020

Shrimp and Pineapple Stir-fry

My mom is living with us while she fights cancer. She loves pineapple and shrimp, so I made this for her. It was so good. The dish is beautiful and would be great to serve to guests.

As always, here are my suggestions for tweaking the recipe. You can buy the shrimp already cleaned. It saves you about ½ hour. You can also use fresh pineapple. If you do that substitute orange juice for the pineapple juice. That way you won’t have a jar of pineapple juice you won’t use going bad in the fridge.  I try never to ask you to purchase anything that you will only use in the specific dish we are making. Buy hoisin sauce. Once you taste it, you will find uses for it. Your favorite hot sauce will do if you don’t have sriracha.

Always read the entire recipe before you begin.


Shrimp and Pineapple Stir-fry


Servings: 6-8
Time:  Prep: 10 minutes; Cook: 20 Minutes;  Dinner in 40 minutes
Hardware:  Measuring spoons and cups, a cutting board and knives, a can opener, a whisk, 2 mixing bowls,  a deep, non-stick skillet, tongs, a paper towel lined plate, paper towels, and a large serving platter

Ingredients:
  • 1 ½ pounds medium cleaned shrimp
  • Enough oil to cover the bottom of the pan twice
  • Salt
  • 1 tablespoon of onion powder
  • 1 tablespoon of garlic powder
  • ¼ cup of cornstarch
  • 1 cup of snow peas
  • 1 large red bell pepper
  • 1 tablespoon of minced fresh ginger or ¼  teaspoon powdered ginger
  • 3 cloves of garlic
  • 1-20 ounce can of pineapple chunks or 2 cups of fresh pineapple
  • 3 cups of steamed white rice
  • Sesame seeds and 2 green onions for garnish
Sauce
  • ½ cup pineapple juice 
  • ¼ cup hoisin sauce
  • ⅛ cup COLD water
  • 1 tablespoon cornstarch
  • 2 teaspoons soy sauce
  • 1 teaspoon sriracha (optional)

  1. Place the cornstarch into one of the mixing bowls. Generously sprinkle the shrimp with salt, garlic powder and onion powder. If you are using powdered ginger, sprinkle that on, too. Place the seasoned shrimp into the cornstarch and toss to coat. Set aside. The shrimp will get sticky, don’t worry.
  2. Drain the pineapple, reserving ½ cup of the juice. Put the cold water and cornstarch into the other mixing bowl. Whisk until the cornstarch is completely dissolved. Whisk in the juice, hoisin sauce and soy sauce. Stir in as much or as little sriracha sauce as you want. Set aside.
  3. Cut the bell pepper into long thin strips, removing the seed and white pith. Set aside. Mince the ginger and garlic. Roughly chop the green onions, using both the white and green parts. Set aside.
  4. Cover the bottom of the skillet in a generous amount of oil and heat over medium-high. Sauté the shrimp in a single layer until they are crispy and then flip and cook through. This should take no more than 2 minutes per side. You may need to cook them in batches to keep from crowding them. Remove them to the paper towel lined plate when finished. You can keep them warm in the oven on the lowest setting.
  5. Wipe out the skillet. Add enough oil to cover the bottom of the pan and heat over medium high, Add the peppers and snow peas. The peppers take longer than the peas, so I put them in a minute or two first. Sauté until they reach your desired tenderness tossing almost constantly. Push to the side and add the fresh ginger (if you are using it) and garlic. Sauté until fragrant. Add in the pineapple and the sauce, whisk until the sauce thickens and gently toss all the vegetables until everything is coated. Taste and adjust the salt.
  6. To serve, make a bed of hot white rice. Top with the vegetables. Then top the vegetables with the shrimp. Sprinkle on the sesame seeds and green onions. Serve hot.

Thursday, June 18, 2020

Rotisserie Chicken Patties


Rotisserie Chicken Patties

My grocery store often has sales on rotisserie chicken. I always buy two whenever they do. I remove as much meat as possible and then use it to make chicken salad, BBQ chicken sandwiches or chicken soup. I also make Chicken Patties. You can serve them as is with chicken gravy and mashed potatoes. I like to make Chicken Patty sandwiches.

You can use any kind of creamy salad dressing with this recipe. I used ranch because that is what was in the fridge. I have used Caesar dressing instead and it is just as yummy. I wouldn’t recommend bleu cheese dressing with this, even though I love bleu cheese.

Bacon is optional. One way to save time is to fry a whole package of bacon when you aren’t busy. Then crumble and freeze it. You will have no fuss bacon crumbles on hand whenever you need them. A tablespoon of bacon crumbles roughly equals one slice of bacon.

When you are shaping the patties, don’t be afraid to really mush them together. They are delicate and will fall apart easily if you don’t. Also, don’t throw away the cleaned chicken. You can save the chicken and the ends of carrots, onions and garlic and the tops of celery in the freezer in a bag until you are ready. Just throw the whole carcass and the veggie pieces into a pot of boiling water. Turn the pot down and simmer until the liquid is reduced by half. Strain everything and you have the base for a delicious chicken soup or gravy. (Discard the stuff you strained.)

Servings:  4
Time:  Cook time: 10 minutes, active time: 25 minutes, Dinner in about 30 minutes
Hardware:  Measuring cups and spoons, a mixing bowl, a cutting board and knives, a wooden spoon, a bowl or shallow dish, a skillet, a large spatula for turning, 2 plates, paper towels
Before you start: Read through the entire recipe. Pre-measure all of the ingredients. Have all of the required utensils laid out before you begin.

Ingredients
  • 2 cups rotisserie chicken
  • 1 green onion
  • 2 pieces of bacon (optional)
  • ⅓ cup dressing, maybe more (I used Marie’s Creamy Ranch)
  • 1 egg
  • ½ cup grated Parmesan cheese, maybe more
  • 1 cup plain breadcrumbs
  • Olive oil to cover the bottom of the skillet
  • Salt & Pepper
  1. Remove the meat from the chicken, discarding the skin, fat and gristle. You only need two cups. Shred any large pieces.
  2. Wash and slice the onions as thin as possible, use both the green and white parts. Crack the egg into the mixing bowl and beat it. Mix in the dressing.  Place the crumbs into the shallow bowl. Cover one of the plates in paper towels. Set aside.
  3. Cook and crumble the bacon. Do not clean out the skillet.
  4. Mix the chicken, onion, bacon and Parmesan in the bowl with the dressing mixture. Shape the mixture into 4 hamburger sized patties. If the mixture isn’t sticking together you may need to add a tiny bit more dressing or Parmesan cheese. Generously salt and pepper the outside of each patty. Then lay the patty into the crumbs. Mash it just a little to make sure the crumbs adhere. Flip the patty and cover the other side. You can lay the patties onto the empty plate while you clean your hands and get the skillet ready. Allowing the patties to rest will also help them hold together.
  5. Use the same skillet you used for the bacon. If there isn’t enough bacon fat to cover the bottom of the skillet, add more. Heat the oil on medium. SautĂ© the patties until they are golden brown (about 5 minutes.) Carefully flip the patties and cook the other side. Drain on the paper towel covered plate. Serve warm.