Eat!

Eating is a necessity. However, we choose what to eat. The choices we make reveal a great deal about us. The food you eat can tell quite a bit about your heritage, your family, your fears, your sense of adventure, your attitude toward yourself and others, and a myriad of other personal tidbits to anyone paying attention. Everything about eating is a glimpse into your soul.

I hope to reveal a little bit about myself to you through my food. I enjoy cooking. I enjoy eating. I find pleasure in bringing pleasure to others. I hope that by sharing my recipes I bring you a little bit of joy.

Cook my food. Feed it to the people you love.

Friday, July 31, 2015

Tam-Tam Shrimp

I recently visited North Carolina and brought home too many jars of honey.  I brought home more than we usually use in a year.  Something had to be done.  As luck would have it, our favorite seafood store was having a sale on locally caught, never frozen shrimp.  My husband purchased more of that than we eat in a lifetime.  So, this dish coalesced from a need to make space in my fridge and eat the shrimp before we needed to freeze it. 

The first time I made this dish, I used too much soy sauce.  It was so salty that it was almost inedible.  I cut way back on the second go ‘round.  In fact, if I were to make this again I might use low sodium soy sauce.  I am also going to substitute the lemon with other citrus fruits.  The lemon was delicious, but I am interested to taste the difference that lime, orange, or even grapefruit might create.

If you are gluten free, you can substitute amaranth for the wheat flour and arrowroot for the cornstarch. You could substitute the wheat flour with nut flours (almond, coconut) but I prefer amaranth.  The taste is much closer to wheat flour than others I have tried. Arrowroot works as a thickener, just like cornstarch. 

I asked the followers on my Facebook page to name this dish.  Tam-tam shrimp was my favorite.  It might be yours, too.

Servings: 4-6
Time:    Prep: 15 minutes; Cook: 15 Minutes
Hardware:  Measuring spoons and cups, a cutting board and knives, a gallon Ziploc bag, a wooden spoon, a whisk, tongs, two bowls, a skillet, a pot, a strainer

Ingredients:
  • Cup honey
  • Cup very hot water
  • 2 tablespoons soy sauce
  • 3 cloves garlic
  • 1 tablespoon ginger
  • Zest and juice from one lemon
  • ½ tablespoon red pepper flakes (plus more for garnish)
  • 1 lb. large (31-35 count) shrimp (Buy cleaned)
  • 1 cup flour
  • 2 tablespoons cornstarch
  • 2 tablespoons olive oil (maybe more)
  • 2 packages Raman noodles
  • Green onions chopped

  1. Remove the shell and tail from the shrimp. Rinse them and place them in the Ziploc with the flour and cornstarch.  Shake like crazy.  Set aside until needed.
  2. Mince the garlic and ginger.  Place them into one of the bowls.  Zest and juice the lemon. Mix the lemon juice, zest, hot water, honey, and soy sauce into the bowl with the garlic and ginger. Stir until the honey is melted.  Set aside.
  3. Put the pot full of water on to boil.
  4. Heat enough olive oil to cover the bottom of the pan on medium high.
  5. Shake as much flour from the shrimp as possible and add it to the pan.  Don’t crowd the shrimp.  You may need to cook it in batches.  Sauté the shrimp for 2- 3 minutes per side.  When in doubt undercook, as the shrimp will cook more in the sauce. Remove the cooked shrimp from the pan and keep it warm in other bowl until you are finished.
  6. If you are cooking in batches, you may need to add a little more olive oil if the pan becomes dry.  You will have a light layer of flour left in the pan.  Turn the pan down to medium and add
    Step 6
    the liquids and pepper flakes.  Use the whisk to deglaze the bottom of the pan. Allow the sauce to simmer for about 3 minutes.  Using the whisk, stir often, scrapping the bottom and sides of the pan as you do.
  7. While the sauce is simmering, cook the noodles.  Drain.
  8. Add the shrimp to the sauce and cook for another minute or so until everything is warmed through and the shrimp is coated.
  9. Taste and adjust the seasoning. You probably will not need salt as the soy sauce is salty.
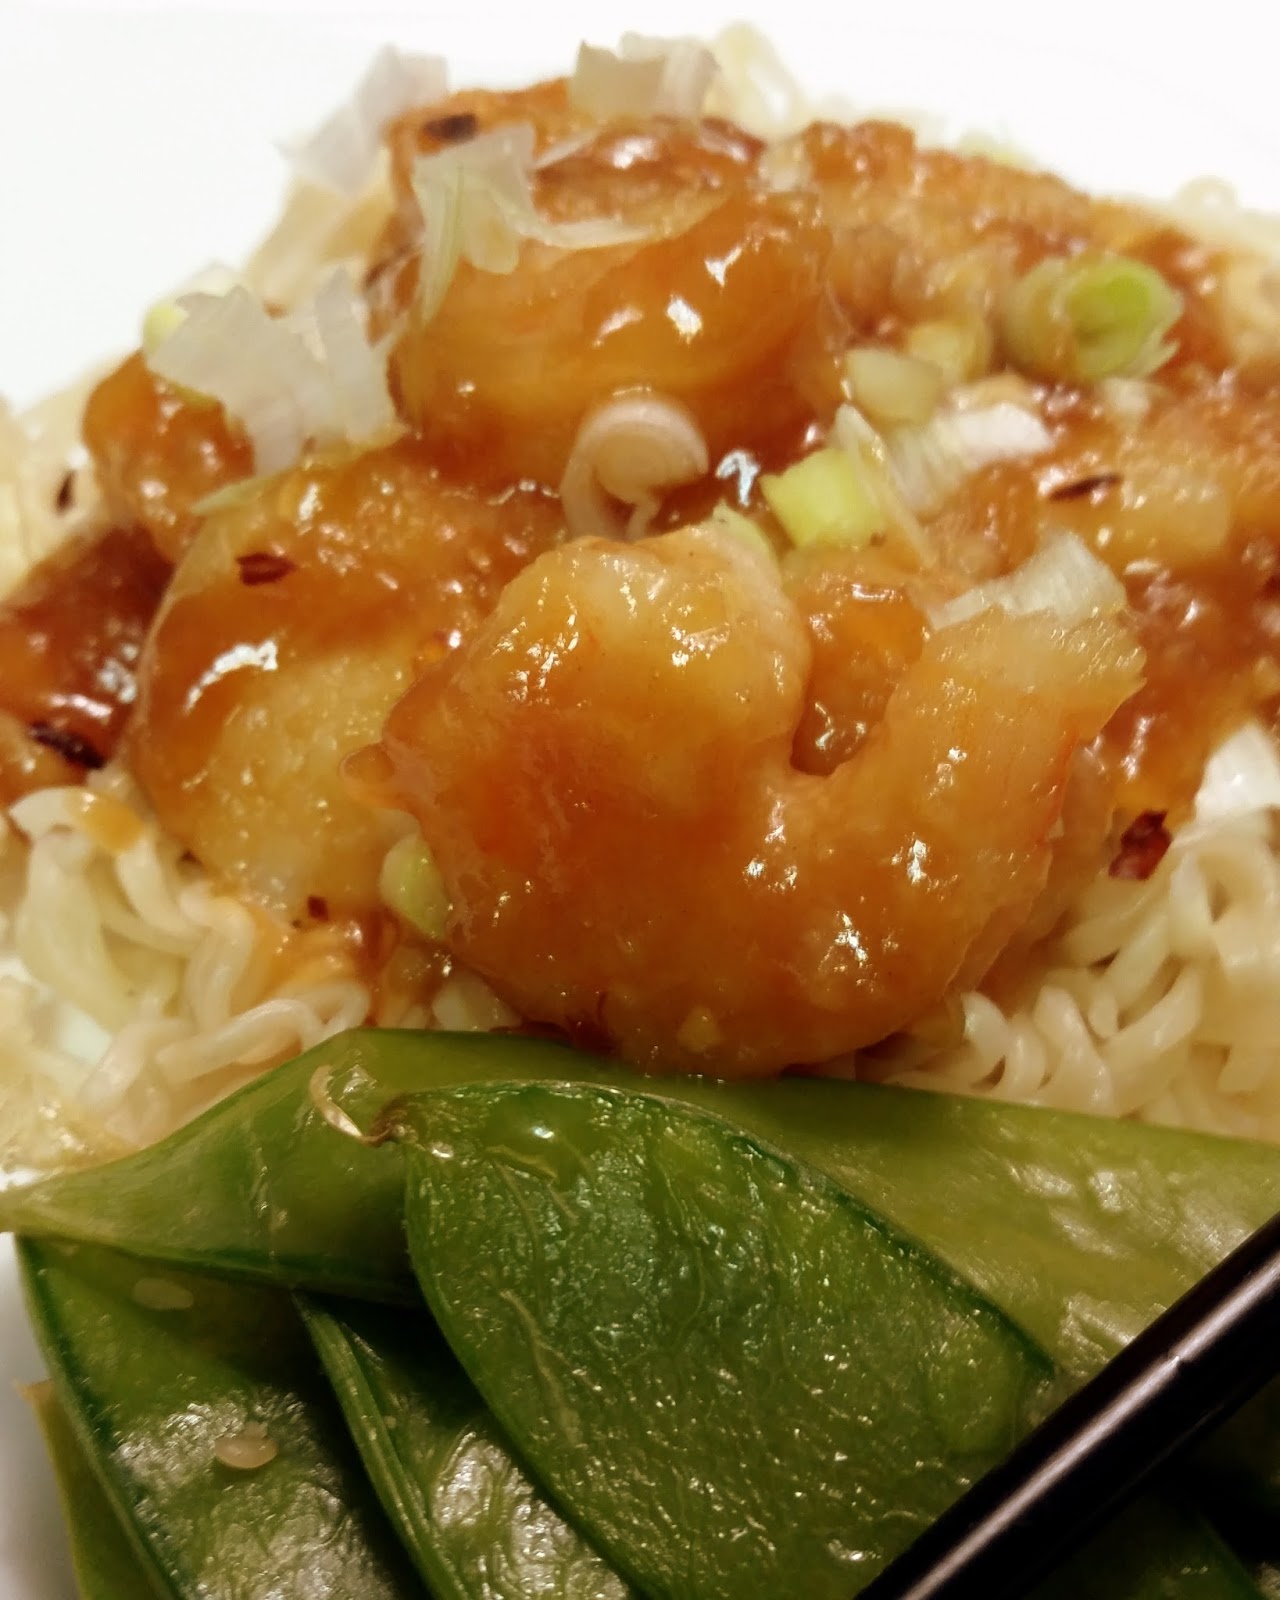
  10. To plate, make a nest of the noodles.  Top with shrimp, extra sauce, and sprinkle with chopped onions and more pepper flakes.


Tam-Tam Shrimp with
Sesame Snow Peas

Sesame Snow Peas

Sesame Snow Peas
We don’t eat enough green.  I have made a promise to myself to incorporate more veggies into our meals.  The problem with this is that my husband doesn’t really like vegetables.  He will eat broccoli, green beans, and corn.  Recently, I have noticed that he will eat one or two bites of some other vegetables as long as those veggies aren’t peas or cabbage or squash or eggplants or Brussels sprouts or….. You see where I’m going?

I made Sesame Snow Peas to accompany Tam-Tam Shrimp. I like this dish because it is very easy to make and tastes great.  My husband even ate three snow peas.  We take what victories we can get.

Servings: 4-6
Time:   Prep: 3 minutes; Cook: 6 Minutes
Hardware: microwave, microwave safe plate, plastic container with a lid, measuring spoons


Ingredients:
  • 2-6 ounce fresh, steam-in-the-bag snow peas (can be found in the produce section)
  • 1 tablespoon onion flakes
  • ½ tablespoon sesame seeds
  • 1 teaspoon sesame oil (maybe more)
  • Salt
  1. Steam the snow peas on the plate according to package directions.
  2. Place them into the plastic container as soon as you remove them from the microwave.  Be careful to not burn yourself.
  3. Add the onion flakes, sesame seeds, sesame oil, and a little salt.  Seal the lid and shake like crazy.
  4. Taste and adjust the salt. You can also add a TINY bit more oil, but be careful because a tiny bit goes a long way.  Serve warm.


Wednesday, July 15, 2015

Spanish Style Shrimp with Couscous

I am often inspired by the flavors and tastes of other cuisines. So I decided to make a dish inspired by Spain. I cannot call this Spanish Shrimp as I am not Spanish nor am I trained in Spanish cooking.  But I think it is fair to call it Spanish Style Shrimp.


Spanish food should not be confused with Mexican food with which I am much more familiar. It actually has more in common with Italian and North African food. And like Italy each region has different ingredients and cooking styles.  But regardless of region, dishes typically include olive oil, fresh vegetables, ham, sausage, seafood, and herbs and aromatics like garlic, oregano, rosemary, and thyme. 

So, this is my take on Spanish food.  I think it turned out really well.

Servings: 4-6
Hardware: knives and a cutting board, measuring spoons and cups, 3 bowls, a fork, a saucepot with a lid, a skillet, a wooden spoon, and a large serving dish
Time:  Prep 10 minutes, cooking 20


Ingredients:
  • 1 pound (31-35 count) shrimp (You can usually buy these from your fish guy already cleaned)
  • 1 tablespoon olive oil
  • 1 small onion (½ cup)
  • 3 cloves garlic
  • 2 large tomatoes (2 cups)
  • 1 tablespoon dried oregano
  • 1 tablespoon sweet paprika
  • ½ teaspoon red pepper flakes
  • S&P
  • ………………………….
  • 1 ¼ cups water
  • 1 teaspoon olive oil
  • 1 tablespoon dried parsley
  • ½ teaspoon salt
  • 2 bay leafs
  • 1 cups instant couscous
  • ½ cup frozen peas
  • Olive oil or lemon juice for garnish
Spanish Style Shrimp with Couscous
  1. Generously salt the shrimp and sprinkle it with the paprika and oregano.  Set aside.
  2. Chop the onion and garlic.  Seed and chop the tomatoes.  Set aside.
  3. Add the water, teaspoon of oil, parsley, and salt to the pot and bring to a boil.
  4. Add the frozen peas and bay leafs. As soon as the water returns to a boil stir in the couscous.  Cover and remove from the heat.  Allow the couscous to rest WITHOUT REMOVING THE LID.
  5. While the couscous is resting, sauté the onions and garlic in the olive oil over medium high heat.  Cook for 5-6 minutes or until the onions are translucent.  Add the shrimp and pepper flakes.  Flip the shrimp after 2 minutes.  Add the tomatoes and cook until the shrimp are cooked through, another 3-5 minutes.  Remove from the heat. When in doubt, undercook as the shrimp will continue to cook for a bit.  Taste and adjust the salt and pepper.
  6. Fluff the couscous with a fork.  Remove the bay leafs and adjust the seasonings.
  7. To plate, mound the couscous into the middle of a serving dish and make a little well in the center. Pour the shrimp into the well.  You can LIGHTLY drizzle light olive oil or lemon juice over the dish if you want.  Serve warm.

Wednesday, July 1, 2015

Pan Seared Ribeye with Compound Butter

Instead of burgers and hot dogs, I decided to make steaks for our Independence Day celebration.  We have been attending many cookouts and children’s birthday parties and are sort of hamburger/hot dogged out.  I could have made pulled pork sandwiches, but I wanted to do something new for the blog.  So, steaks seemed the most logical choice.

Usually my husband is in charge of choosing and preparing steaks. But I am using this blog as a learning tool and decided to do this myself.  I chose ribeye steaks because they are the tastiest.  When choosing steaks you want to find slabs that are marbled, meaning having veins of fat throughout.  Well-marbled steaks are juicier.  You also want to purchase pieces of meat that are at least an inch thick.  Otherwise, you will have difficulty preparing them to any temperature less than medium.

I was worried about cooking the steaks to the correct temperature.  I like mine a little rarer than my husband who prefers his medium-rare.  I am not yet comfortable with the grill, so I pan seared the steak.  I researched many sites for information on cooking steaks in your kitchen.  I adapted my cooking method from Alton Brown.  Worked out perfectly.

I’m a big believer in keeping steak simple.  If you pay a small fortune for a piece of beef, you want to be able to taste it. So, instead of marinating the steak or creating some sort of rub, I flavored it with compound butter.  You can use any herbs you want, I just happened to have rosemary on hand.  You can use the compound butter for other purposes.  Rub hot corn on the cob with flavored butter. Mix it in your favorite veggies.  Or use it on a baked potato or add it as a finishing touch to mashed potatoes. 

I will definitely make more steaks.  I hope to learn to use the grill, but for now this was a success.

Servings: 2
Time:   Prep: 10 minutes; Rest: 2 hours; Cook: 6-7 Minutes
Hardware:  Measuring spoons, a cutting board and knives OR a spice grinder, a zester, a mixer and mixing bowl, a wooden spoon, a rubber spatula, an airtight container, plastic wrap, a large, heavy bottomed skillet that can be used on the stove top & in the oven (I prefer cast iron), tongs, heavy duty potholders, 2 plates, tinfoil

Ingredients:
  • 2- 1 to 1¼ inch thick ribeye steaks
  • 2 sticks of softened, salted butter
  • 4 cloves garlic
  • 2 tablespoons rosemary
  • 1 tablespoon chives
  • 1 teaspoon lemon zest
  • Salt & pepper

I use a coffee grinder to chop the garlic and rosemary. 
Make sure to wipe it out between spices and to use a separate grinder for coffee.


  1. Dice the chives and zest the lemon and set aside.
  2. Dice the garlic and rosemary.  Heat 2 tablespoons of the butter over medium-high.  Add the garlic and rosemary.  Sauté until the garlic turns golden brown, about 2 minutes.
  3. Add the cooked herbs (with butter), chives, lemon zest, and butter to the mixing bowl.  Whip until the butter is fluffy.
  4. Scrape the whipped butter into the airtight container.  Place a piece of plastic wrap over the butter and make sure that it comes into contact with the entire surface of the butter.  Cover and place in the fridge.
  5. Remove the steaks from the fridge about an hour before you want to cook them.  Salt and pepper them generously on both sides.
       This gives you steak that is seared on the outside, but juicy in the middle.  The compound butter imparts just enough flavor to complement but not over power the ribeye.
  6. Pre-heat the oven to 500˚.
  7. On top of the stove get the skillet as hot as possible.  You can even stick it in the oven, just be careful. 
  8. One at a time, lay each steak in the middle of the hot skillet.  Don’t touch it, or poke it, or anything.  Leave it alone! After 30 seconds, remove it to one of the plates.  Do this to the other steak.  Now sear the opposite side the same way, one steak at a time, no moving, for only 30 seconds.
  9. Now put the skillet in the oven.  Lay both steaks in the skillet and roast in the hot oven for 2 minutes.  Flip and place a large dollop of butter on each steak.  Roast for 2 more minutes.  This will give you medium rare steaks.
  10. Remove from the oven and place on the clean plate.  Loosely tent with foil and allow to rest for 5 minutes.

Pan Seared Ribeye with Compound Butter
 Red, Hot, and Blue Potato Salad


Red, Hot, and Blue Potato Salad

I was trying to come up with a side dish for our 4th of July celebration.  I thought about pasta salad, but couldn’t think of a way to work in the Independence Day theme.  So I was digging through my pantry for inspiration and saw that I had red and white new potatoes.  A light bulb went off in my head.  I could add blue (well purple, but work with me folks) potatoes and make Red, White, and Blue Potato Salad.  Then I remembered that my husband doesn’t like cold potato salad.  Lucky I am resourceful.

So I present my Red, Hot, and Blue Potato Salad.  It is yummy and bacon-y and American and star spangled.  Okay, I’m getting carried away, but it’s really good.

Red, Hot, and Blue Potato Salad
Servings: 6-8
Time:    Prep: 10 minutes Cook: 10-15 minutes
Hardware:  Measuring spoons and cups, cutting board and knives, an air tight container, a pot, a colander, a large mixing bowl, a wooden spoon

Ingredients: 
  • 1 ½  pounds red, white, and purple new potatoes
  • 1 small onion (¼ cup)
  • ⅓ cup oil
  • ⅓ cup apple cider vinegar
  • 2 tablespoons spicy course ground mustard
  • 6 slices of cooked crumbled bacon
  • Chives (optional)
  • Salt & Pepper
  1. Rinse the potatoes.  Cut them into quarters. Place them in the pot of salted boiling water.   Only cook them until they are fork tender.  This will take about 10 minutes.
  2. While the potatoes are cooking, roughly chop the onion.  Place he onions, oil, vinegar, and mustard in the airtight container and shake vigorously to mix.
  3. Drain the potatoes and in the mixing bowl gently mix the crumbled bacon, potatoes and dressing.  Check the seasoning and salt and pepper to taste.
  4. Serve warm.  You can top with chopped chives right before serving for added crunch and color.


Pan Seared Steak with Compound Butter
Red, Hot, and Blue Potato Salad