Eat!

Eating is a necessity. However, we choose what to eat. The choices we make reveal a great deal about us. The food you eat can tell quite a bit about your heritage, your family, your fears, your sense of adventure, your attitude toward yourself and others, and a myriad of other personal tidbits to anyone paying attention. Everything about eating is a glimpse into your soul.

I hope to reveal a little bit about myself to you through my food. I enjoy cooking. I enjoy eating. I find pleasure in bringing pleasure to others. I hope that by sharing my recipes I bring you a little bit of joy.

Cook my food. Feed it to the people you love.

Thursday, May 26, 2022

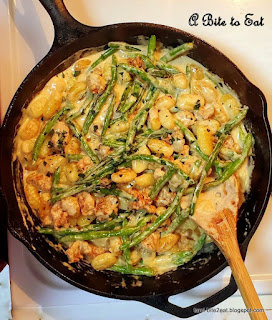
Creamy, Spicy Sausage, Green Beans and Gnocchi

I haven’t made a blog post in a long while. Life got in my way. But I was still cooking. Still recording everything. And I’m back.

Lately, I’ve needed comforting. This dish is the ultimate comfort food. Puffy little pillows of gnocchi, hearty sausage, creamy Parmesan sauce, and green beans because we have to eat our vegetables.

Servings: 4-6
Hardware:  A cutting board and knives, measuring spoons and cups, a large skillet (I prefer cast-iron), a large pot, a heavy wooden spoon, a large bowl, and a large slotted spoon
Time:  Cook time: 30 minutes, active time: 20 minutes, Dinner in about 40 minutes


 Ingredients:

  • 1 pound of spicy Italian sausage
  • 12 ounce of gnocchi
  • 8 ounce of fresh green beans
  • ½  tablespoon of butter
  • ½  tablespoon of olive oil (maybe more)
  • 4 garlic cloves
  • ¾  cup of low sodium chicken broth
  • ¼ cup of heavy cream
  • ¼ cup Parmesan Cheese
  • 1 tablespoon of fresh parsley
  • Salt and pepper
  1. Wash and dry the green beans. Snip off the ends and cut them in half. Mince the garlic. Roughly chop the parsley. Remove the sausage from the casing. Put the large pot of salted water onto boil. Set everything aside. 
  2. Heat the butter and olive oil in the skillet on medium. Add the sausage. Cook and crumble the sausage until it is no longer pink. This should take 8-10 minutes. Remove the sausage and place it in the bowl. 
  3. In the same skillet, toss in the green beans and minced garlic. Add a little salt. Toss enough to keep the garlic from burning. You may also need to add more oil if the skillet dries. 
  4. While the green beans are sautéing, place the gnocchi into the boiling water. Gnocchi cook in 3-4 minutes. They are done when they float. Use the slotted spoon to scoop the floating pasta out of the pot and place it into the skillet with the beans. Cook, tossing frequently, until the gnocchi are golden brown on all sides. 
  5. Return the sausage to the skillet. Add in the chicken broth and cream. Turn the skillet down until the sauce is at a low simmer. Simmer until the sauce is the desired thickness, maybe 5 more minutes. 
  6. Stir in the cheese, taste and adjust the salt and pepper. Sprinkle the parsley over the dish before serving.


Sunday, March 13, 2022

Pasta Carbonara

Pasta Carbonara is an authentic Italian dish consisting of pasta, eggs, hard cheese and black pepper.

The dish originated in Rome.  The authentic dish uses guanciale, which is cured hog cheeks and Pecorino Romano cheese. Obviously, I have substituted bacon for the  guanciale, but if you can find it use it. Pecorino Romano is sharper than Parmesan, but they are pretty interchangeable. Finally, the original dish does not use garlic. However, I love garlic and it is wonderful with bacon.

So, I guess that I am not giving you an authentic Italian dish, but an Italian dish with American leanings. It’s me, I am the Italian dish with American leanings.

Read through the entire recipe. The final steps must be done while the pasta is still hot enough to cook the eggs.


Pasta Carbonara

Servings: 4-6  
Time: Prep Time 10 mins: Cook Time 20 mins, Dinner in 40 minutes
Hardware:  A large pot, measuring spoons and cups, a cutting board and a knife, a large skillet, a small bowl, a very large ceramic or glass bowl, a large metal tablespoon, a whisk, tongs

Ingredients

  • 1/2-pound thick cut bacon
  • 2 garlic cloves
  • 5 egg yolks
  • ¾ cup grated Pecorino cheese, more for serving
  • 16 ounces spaghetti
  • Salt
  • Fresh  ground black pepper
  • 2 teaspoons of fresh chopped parsley (optional.
  1.  Put a large pot of salted water on to boil  
  2. Dice the bacon and mince the garlic, set aside. If you are using parsley, chop it now.
  3. Put the yolks into the small bowl and whisk vigorously, set aside
  4. While the water is coming to a boil, heat the skillet over medium and slowly cook the bacon until it is crispy. Add the garlic and cook until it is fragrant, for a minute or two. Remove from the heat and place the bacon, garlic, and a good deal of the bacon fat (two tablespoons) into the large bowl.
  5. The water should be boiling now. Add the pasta and cook according to the package directions.
  6. When the pasta has only a minute or two left to boil, begin to rapidly whisk the egg yolks. SLOWLY, add a tablespoon of the boiling pasta water, but never stop moving the whisk. Add another tablespoon of boiling water, whisking the entire time. Do this until you have added 4 tablespoons of boiling water to the yolks. You are tempering the eggs. This way, you won’t get scrambled eggs as you finish the recipe.
  7. Working quickly, when the pasta is al dente, use the tongs to add it to the bacon. It is okay if you get a little water in the mix.
  8. Add the egg yolks and cheese and toss the pasta using the tongs. The hot pasta will cook the tempered eggs. If you want a little more sauce, add pasta water, a tablespoon at the time, until you are happy. If you are using parsley toss it in now. Add salt and fresh ground pepper to taste. Serve right away


Sunday, February 13, 2022

Lemon Pepper Wings with a Balsamic Vinegar Sauce

This recipe comes too late for you to use it for this year’s Super Bowl. Just make them next weekend!

Servings:  2 dozen wings

Hardware:  Kitchen scissors, measuring spoons and cups, a microplane or knife, food prep gloves, a wooden spoon, a large plastic storage bag, tongs, a large heavy skillet, a baking sheet, a cooling rack (optional), foil, a saucepan, a large mixing bowl, an oil thermometer, a meat thermometer

Time: Active time: 10 minutes- Cook time: varies-Wings in an hour

Ingredients:

  • 2 dozen wings
  • 4 tablespoons Lemon & pepper Seasoning (I like McCormick Culinary Lemon & pepper)
  • 1cup balsamic vinegar
  • ¼  cup water
  • 4 cloves garlic
  • 2 tablespoons white sugar
  • Oil to fill your skillet halfway
  • Cooking spray
  1. Use the kitchen scissors to separate the flaps from the drumettes. Also, snip the points from the flaps. Place the wings and the lemon pepper in the plastic bag. Shake like crazy. Make sure that all the wings are covered in seasoning. Set aside. Do this about thirty minutes early. You want the chicken to be room temp all the way through so that they will cook evenly. You do not want them to sit out very long at room temperature and you wan to make sure all the chicken is cooked through. GET A THERMOMETER.
  2. Line the baking sheet with foil. If you have a cooling rack place it over the foil-lined sheet. Spray with cooking spray. Place the pan in the oven on the lowest setting.
  3. Use the microplane or the knife to mince the garlic. Place the vinegar, water, garlic and sugar into the saucepan. Bring it to a rolling bowl. Turn the heat down to a low boil. Stir often enough to keep the garlic from settling. The vinegar will reduce and thicken as it cooks.
  4. Put enough oil into the pan to fill it halfway. Heat the oil over medium until it reaches a temperature of 375˚ F. Try to keep the oil between 350˚ F and 375˚ F. When the oil is hot, fry the wings for 4-5 minutes per side. Do not over crowd them. You may need to cook in batches. The chicken is done when the thickest part measures 165˚. The flats cook faster than the drums. As they finish, place them on the prepared baking sheet. Putting them onto a cooling rack instead of directly onto the foil will keep them crispy.
  5. When you have finished all the wings, remove them from the oven and pour all the juices from the sheet into the balsamic vinegar. Toss the wings in the sauce and make sure they are completely coated. Serve warm.

Sunday, January 23, 2022

Pork Milanese

Milanese is a very old recipe. During the 1st century BC, Romans ate dishes of thinly sliced, breaded, fried meats. It is very similar to the Austrian dish Wiener Schnitzel.

I love the simplicity of this dish. It is easy to make and delicious. You will see other recipes suggesting you serve it with pasta or rice. Milanese is traditionally eaten over arugula tossed with Parmesan. Fresh lemon juice is squeezed over the entire dish.

Pork Milanese
Milanese is normally made with veal. I couldn’t find veal and I know that many people don’t eat veal, so I substituted pork. (Although, I had I found veal, I would have eaten it.) You can use traditional Italian breadcrumbs, but panko are crispier. If you do not have a meat mallet, you can use a heavy cup or a skillet. Get a meat mallet for heaven’s sake, though.

As always read through the recipe before starting

  • Servings:  6
  • Time:  Cook time: 20 minutes, cook: 15 minutes, Dinner in about 40 minutes
  • Hardware:  Measuring cups, plastic wrap, a meat mallet, a cutting board, 3 shallow bowls or dishes, a skillet, a large spatula for turning, paper towels, optional: a cooling rack placed over a baking sheet


 Ingredients

  • 1 cup panko breadcrumbs
  • 1 cup flour
  • 3 large eggs
  • 6 boneless center cut pork chops
  • Salt and pepper
  • Olive oil to cover the bottom of the pan
  • 3 lemons
  • Arugula salad and freshly grated Parmesan for serving.
  1. Cut the lemons into wedges. Set aside
  2. Thoroughly dry the pork.  Working with one pork chop at a time, place it on the cutting board and cover it in plastic wrap. Use the mallet (or a heavy skillet or coffee cup) to pound the chop until it is ⅓ inch thick. Repeat until all the pork is pounded thin. Generously salt and pepper it on both sides.
  3. Place the flour into one of the shallow dishes. I use glass pie plates for this purpose. Beat the eggs in the second dish. Then put the panko into the third dish. You can kind of crush the crumbs up a little.
  4. Add enough oil to the skillet to cover the bottom. Heat over medium. If you cook at a higher temp, the breadcrumbs will burn before the pork finishes. You want the oil to be hot enough that flour sizzles when sprinkled into it. You may need to add more while cooking.
  5. Dip each chop into the flour and shake as much from it as possible. Then dip it into the eggs and then into the crumbs. When you place the chop into the crumbs, press down and make sure that it is covered. When you are breading always go-dry, wet, dry.
  6. When the oil is sizzling, fry the pork chops without them touching. Fry on each side for about 3-4 minutes or until golden brown. Don’t crowd, you may need to cook in batches. Add more oil if the pan gets dry. Use the spatula and not a fork to flip the meat. Remove the finished pork chops to the cooling rack. You can keep them warm in the oven on the lowest setting. Placing them on a cooling rack will keep them  crispy.
  7. To serve, toss the arugula with the freshly grated Parmesan. Squeeze a little lemon juice over the salad. You can either slice the pork and serve it over the arugula with another lemon wedge or serve it beside the salad with the lemon.
  8. Simple and delicious!

Friday, January 14, 2022

Cranberry Orange Quick Bread with Cream Cheese Glaze

This is the third quick bread that I have created recently. For some reason, it took me four tires to get it right. The first time, I think I used too much leavening because it rose QUICKLY and then collapsed. The second time, I used too much liquid. That one sort of reminded me of bread pudding, if bread pudding was terrible. The third time, I do not know what in the Hades I did, and we won’t talk of it anymore.

Fourth time was magic.  The texture of the Cranberry Orange Quick Bread was dense and moist. The bread itself was sweet, but not too sweet, and the presentation was wonderful. The bread was so pretty, with a toasty orangeness speckled with deep red cranberries. I made two more of these!

You can use bottled orange juice and skip the fresh zest if you want, but don’t be like that.  I added a Cream Cheese Glaze. The bread itself is sweet enough that it does not need it, but it is pretty and frosting, who doesn’t want pretty? Frosting? This makes waaaay more than you will need. Make another loaf of bread.

 Cranberry Orange Quick Bread

  •  Servings:  1 loaf
  • Time:  Prep: 15 minutes, cooking: 55-60 minutes, cooling time one hour
  • Hardware:  Measuring cups and spoons, microwave proof bowl,2 mixing bowls, a mixer, a large wooden spoon, a zester and a citrus juicer (optional,) silicone spatula, a 2- 9x 5 loaf pan, a wooden skewer, and a wire cooling rack

 Ingredients

  • 2 cups flour
  • ¾  cup sugar
  • 1 tablespoon baking powder
  • ¾  teaspoon salt
  • 1 teaspoon cinnamon
  • ¾ cup dried craisins
  • 2 large eggs
  • ½ cup  milk
  • ½ cup orange juice
  • 1 tsp vanilla extract
  • 1 tablespoon orange zest
  • ½ cup (one stick) unsalted butter
  • Butter and or Crisco and flour for the pan

  1. Place a rack at the bottom of the oven. Preheat the oven to 350°. Melt the butter right away to give it time to cool. Grease and flour the loaf pan. It is always better to over grease and flour than under. Zest and juice the orange if you are using fresh juice. Set aside.
  2. Combine the flour, sugar, baking powder, salt, cinnamon, and craisins in one of the mixing bowls.
  3. Beat the eggs in the other mixing bowl. Then add the milk, orange juice, vanilla and orange zest. Beat until thoroughly combined.
  4. Pour the wet ingredients over the dry  ingredients. Then add the melted butter. Use the wooden spoon to mix until just combined. Do not over mix.
  5. Scrape the batter into the pan and spread  it out evenly.
  6. Bake, turning the pan halfway through,  for 50-60 minutes or until the top is golden and a skewer inserted into the center comes out clean.
  7. Cool in the pan for 20 minutes. Remove from pan and cool completely on a wire rack.

  Cream Cheese Glaze

  • Time:  Prep: 5 minutes
  • Hardware:  Mixer, mixing bowl, measuring spoons and cups

Ingredients:

  • 4 ounces of room temperature cream cheese
  • ½  cup powdered sugar
  • 1 teaspoon vanilla extract
  • 3-4 tablespoons of milk
  1. Beat the cream cheese until it is smooth. Beat in the sugar and extract. Add milk a tablespoon at  a time until you get the desired consistency. Drizzle over the cooled bread right before serving