Contents

Saturday, November 17, 2018

Garlic and Herb Rice


Garlic Herb Rice

Rice makes a tasty and simple side dish. Some people have trouble making rice. I was one of those people for a long time. My husband taught me the easiest method. He showed me to just make sure I had three times as much water as I did rice, bring the water to a boil, add the rice and boil for 20 minutes and then drain. This works, but you cannot really flavor the rice. And sometimes you want flavor.

So, I practiced and practiced and threw away or choked down as much rice as I happily ate. I can now make a pot of wonderful, fluffy, tender separate grains of joy every time. Follow these instructions exactly and you will have success, too. 

If you want to change this up a bit, I have a few suggestions. You can substitute any herb for the chives. If you use thyme or basil use ½ tablespoon. If you are using rosemary, just throw in a whole sprig with the garlic and remove before serving. You could also toss in a tablespoon of toasted, chopped pecans or slivered almonds with the herbs.

Servings: 3 cups of rice, serves 4-6
Hardware:  A cutting board and knives, measuring spoons and cups, a strainer (sieve,) a pot with a lid, a sauce pot, a paper towel covered plate, a slotted spoon and a fork
Time:  Active time 20 minutes; Cook: 30 minutes, rice in about 45 minutes

Ingredients

  • 4+1 tablespoons butter
  • 6 cloves garlic
  • 1 tablespoon chicken base (I use Better than Bullion)
  • 1 ¾ cups water
  • 1 cup long-grain white rice
  • 1 tablespoon of chopped fresh chives
  • Salt

  1. Rinse the rice in the sieve until the water runs clear. Slice the garlic into thin slivers. Dice the chives, the smaller the better. Set aside
  2. Put the water onto boil in the sauce pan.
  3. In the pot with the lid, melt 4 tablespoons butter over medium heat. Add the garlic slices and sauté until they just begin to turn golden. Watch them and stir often because they can easily burn. Use the slotted spoon to place them on the paper towel covered plate. Make sure you have removed them all. Set the garlic aside.
  4. Add the rice to butter and stir until the rice begins to toast (about two minutes.) Add the boiling water and chicken base and stir until the base dissolves.
  5. Turn the rice down to simmer and cover with the lid. Simmer for exactly 18 minutes. Remove from the heat, but do not remove the lid. Allow the rice to rest for 10 minutes. It is still cooking so it is important to leave it alone.
  6. Using a fork, stir in the herbs, toasted garlic and extra butter. Taste and adjust the salt. Serve warm.
Wednesday, November 14, 2018

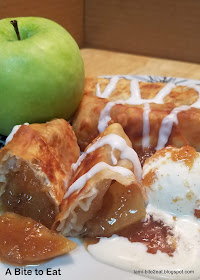
Apple Rolls


Thanksgiving is coming up and I wanted to make a few new recipes to celebrate. Apples are so beautiful and sweet this year. And apples are so perfect for autumn. I wanted to try something different, so I decided to make apple turnovers. That turned out to be harder than I expected.
Apple Rolls

I have tried to make these three times. I used puff pastry the first time. The pastry didn’t puff, and they were soggy. The second time I used pie crust. Too much crust. The third time I used empanada wrappers. Those were chewy and weird. You are probably thinking, “Why didn’t she give up?” Because that is NOT who I am!

Really, part of the fun of creating this blog is challenging myself. I was almost desperate enough to use phyllo dough. I say desperate because while phyllo is beautiful and delicious, it is a bear. Then I thought about egg roll wrappers. I had some in the freezer. Why not?  Why not indeed? These were wonderful.

I know these seem like a long list of instructions, but read over them. They are really easy to follow and quite simple.


Servings: 10 Apple Rolls
Time: Active time 25 minutes; Cook: 15 minutes, eggrolls in about 45 minutes
Hardware:  Measuring cups and spoons, peeler, knife and cutting board, wooden spoon, a large mixing bowl, 2 small bowls, sauce pot, a clean tea towel, a flat surface, a slotted spoon, a deep skillet, oil thermometer, tongs and a paper towel lined plate

Ingredients

  • 3-4 large tart apples~ about 1.5 pounds (I like Granny Smiths)
  • 2 tablespoons lemon juice
  • 2 tablespoons cold water
  • 2 teaspoons cornstarch
  • ¼ cup packed light brown sugar
  • 1 teaspoon ground cinnamon
  • ½ teaspoon pumpkin pie spice
  • Pinch salt
  • Eggroll wrappers
  • Oil for skillet
  • Eggroll wraps (I like Nasoya)
  • Water
  • Optional: Glaze or powdered sugar.

**************
Glaze

  • ½ cup powdered sugar
  • 1 tablespoon milk (maybe more)
  • ½ teaspoon vanilla
Place all the ingredients into a quart Ziploc and massage until thoroughly mixed. You can add a tiny bit more milk if needed. Snip off a corner of the bag and drizzle the finished Apple Rolls with glaze
**************
  1. Peel, core and slice the apples. Try to make them the same thickness, so they will cook evenly. Toss them in the mixing bowl with the lemon juice. Add the brown sugar, cinnamon, pumpkin pie spice and salt.  Lightly fold until the apples are covered.
  2. Dissolve the cornstarch in one of the small bowls with 2 tablespoons of very cold water.
  3. Place the apples and cornstarch-y water into the sauce pot. Cook over low heat until the apples are desired tenderness. I cook them for about 20 minutes. You can add another tablespoon of water if need, but you don’t want the apples to have too much liquid. Mix just enough to keep from sticking. When they are soft enough, remove the apples from the heat and allow them to cool.
  4. Place the oil into the skillet and heat over medium. Use the thermometer to keep the oil around 370˚. While the oil is heating make the Apple Rolls.
  5. Place some water in the other small bowl. Have the clean tea towel handy. Work with 1 wrapper at a time. Keep the other wrappers in their container or they will dry out. Place the wrapper with one corner closest to you as if you were looking at a diamond.
  6. Using the slotted spoon, place about 2-3 tablespoons of the apple mixture in the center of the wrapper. Use the slotted spoon to remove as much liquid as possible. Don’t overfill the wrapper. Spread the mixture out evenly, so that the filling isn’t a big lump in the middle.
  7. Fold the bottom corner over the filling. Tuck the wrapper in around the filling tightly. Be careful not to tear it. (See below)
  8. Using your finger, brush water around the three remaining corners of the wrapper. Water will act as a glue.
  9. Fold the side corners over the filling as if you were making an envelope.
  10. Snugly roll up until it is closed. Press the edges to make sure it is sealed. Continue until you have used all the apple filling.
  11. You can use water to seal any open places. You can also use little pieces of wet wrapper as patches if needed. Use the dry tea towel to clean the flat surface between rolls. If the surface is wet, your wrapper will stick.
  12. Use the tongs to place the rolls, flap down, into the oil. Fry until the roll is golden brown and then flip. Don’t crowd them. You may need to cook them in batches. When they are done, place them on the paper towel lined plate. You can keep them warm in the oven on the lowest setting.
  13. Serve warm or at room temperature. Either drizzle them with glaze or sift powdered sugar over them. Serve with a scoop of vanilla ice cream for an extra decedent dessert. These are better fresh, so don’t plan on leftovers.

Saturday, November 3, 2018

Grillades and Grits


Grillades and Grits

In case you didn’t know, New Orleans is one of my favorite places. I know most people think of it as a place of debauchery and that may be true during Mardi Gras. However, the rest of the time NOLA is simply lovely. Even though it is thoroughly modern, the city still has an old-world feel. This multi-layered culture was created by the French, Spanish, African and Native American people who lived here before there was a USA. It has retained that charm. The first time I visited, it felt like home.

I was worried that after Hurricane Katrina people would come in and try to capitalize on this history and create a Disney version of the real thing. Or that no one would return, and the culture would die. Luckily that did not happen.

When we go to NOLA we visit museums. The Ogden Museum of Southern Art and the World War II Museum are two of our favorites. Music venues like Preservation Hall and The Spotted Cat are always on our itinerary, because why visit the birth place of jazz and not listen to jazz? And of course we eat. And Eat. And Eat. Most every restaurant in New Orleans is going to be good because the city wouldn’t stand for it otherwise. From the very high-end GW Fins to the very affordable Cochon Butcher, New Orleans is about the food.

So, I am giving you a recipe for Grillades and Grits. You pronounce that GREE-odds. This is the quintessential brunch food. These are so good that last week I had them for breakfast at a restaurant and then went home and made them for dinner.


Servings: 8
Time:  Active: 30 minutes   Cooking: 1 ½ -2 hours   Dinner in about 2 ½ hours
Hardware:  A cutting board and knife, measuring spoons and cups, a meat mallet (or a rolling pin or hearty coffee cup) l-gallon plastic zip bags, a deep skillet with a lid, tongs, a large bowl, a wooden spoon, a whisk, a can opener

Ingredients:

  • 2 lbs top round
  • 2 tablespoons Cajun seasoning (I use Tony Chachere’s)
  • 1 cup flour + 3 tablespoons flour
  • 8 ounces trinity mix (this is equal parts onion, bell pepper and celery-I buy mine pre-sliced in the produce section-if you don’t want to buy it pre-sliced then you need 4 ounces of onion and 2 each of celery and green bell pepper, roughly chopped)
  • 3 tablespoons butter
  • 1 ½ cups beef stock
  • ¼ cup red wine
  • 1-2 teaspoons hot sauce (Tabasco)
  • 14.5 ounce can of fire roasted tomatoes, not drained
  • 2 bay leaves
  • Oil
  • ⅓ cup chopped parsley (I save a little for garnish)
  • Salt
  • Prepared grits (To make your grits better, substitute ⅓ of the required water for cream and stir in ½ cup of shredded cheddar cheese and another ⅓ cup cream right before serving)

  1. Cut the meat into bite size pieces and pound to about ¼ inch in thickness. You can skip this step, but if you do the meat will take longer to cook.
  2. Place the Cajun seasoning in the plastic bag. Add the steak and shake to coat evenly. Then add the cup of flour to the bag and shake again.
  3. Add enough oil for your skillet to be about ½ inch deep. Heat it on medium-high heat. Shake the flour from the steak and add it to the hot oil. Just brown on both sides, no more than 1-2 minutes per side. Place the steak in the bowl and set aside.
  4. If you need to add more oil to the skillet, do so. Then add the vegetables and cook until soft, stirring occasionally (5 minutes.) Place the vegetables in the bowl with the steak and set aside.
  5. Melt the butter in the skillet and slowly whisk in the 3 tablespoons of flour. Scrape any little leftover brown bits into the roux. Don’t stop stirring. When the roux is a golden buttery color, slowly whisk in the beef broth. Add the wine, hot sauce and tomatoes. Bring to a boil and stir.
  6. Add the bay leaves, meat and veggies. Stir to make sure that everything is covered.
  7. Turn the heat down to a very low simmer and cover with the lid. Cook until the meat is fork tender. Only stir often enough to keep the food from sticking. Removing the lid slows down cooking time.
  8. Remove the bay leaves and adjust the salt. Stir in the parsley. Serve warm over grits.